Deployment — Setup
From a fresh Linux host (VM, bare metal, or laptop) to a running Genesis stack. Everything is generic: no step depends on a specific hosting provider.
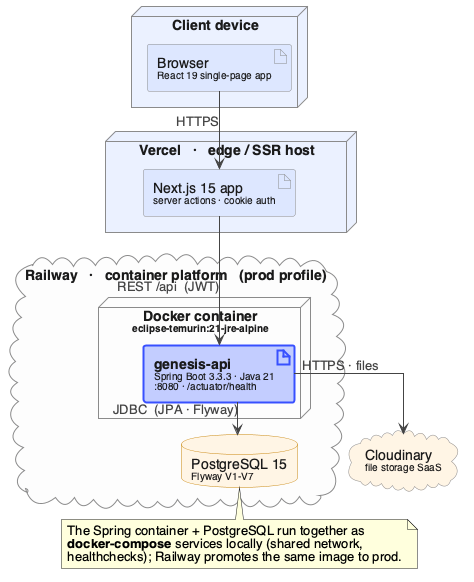
How it works
Both application repos carry a uni-prod branch — the exact code that runs
in production. This deployment repo fetches both repos at that branch into a
git-ignored sources/ directory, builds each app with the Dockerfile
maintained in its own repo, and starts three containers:
postgres (internal only) ← backend :8080 ← frontend :3000 ← users
PostgreSQL is not exposed on the host network; only the backend can reach it.
Prerequisites
- git
- Docker Engine + Docker Compose plugin
- Network access to the git host serving the two app repos
- ~4 GB RAM free for the build (the Maven build stage is the peak)
# Debian/Ubuntu example
sudo apt-get update
sudo apt-get install -y git docker.io docker-compose-plugin
sudo usermod -aG docker "$USER"   # then log out and back in
Step 1 — clone and configure
git clone <genesis-deploy-url> genesis-deploy
cd genesis-deploy
cp config/.env.example .env
Edit .env and set every REQUIRED value:
| Variable | What to put there |
|---|---|
BACKEND_REPO_URL / FRONTEND_REPO_URL |
Git URLs of the two app repos (SSH if the host has deploy keys, or HTTPS with a token) |
DEPLOY_BRANCH |
uni-prod (default) |
POSTGRES_PASSWORD |
A strong generated password |
JWT_SECRET |
Output of openssl rand -base64 48 \| tr -d '\n=' — generate fresh, never reuse a dev value |
STORAGE_PROVIDER |
cloudinary (default) or local. local keeps uploads on disk — no Cloudinary account needed |
CLOUDINARY_* |
Cloudinary account credentials — only required when STORAGE_PROVIDER=cloudinary; leave blank for local |
CORS_ALLOWED_ORIGINS |
The URL users will open in their browser, e.g. http://annotate.example.edu:3000 |
NEXT_PUBLIC_API_URL |
The backend URL as seen from the browser, e.g. http://annotate.example.edu:8080 |
The two URLs must be browser-reachable
CORS_ALLOWED_ORIGINS and NEXT_PUBLIC_API_URL are evaluated in the
user's browser, not inside Docker. Use the hostname/IP users actually
type, and make sure the host firewall allows the two ports.
Choosing a storage provider
cloudinary (default) uploads raw files to Cloudinary — durable and
external, best when the host disk is ephemeral or you run more than one
backend instance.
local writes uploads to a disk volume (STORAGE_LOCAL_BASE_PATH,
default /app/data/uploads, persisted in docker/docker-compose.yml). No
Cloudinary account required, but the volume must be durable and the stack
must run as a single backend instance.
Set STORAGE_RETAIN_SOURCE=false to delete each raw upload once it has been
tokenized — the editor, annotation, and export all read from the database, so
only re-tokenizing from the original is lost. Defaults to true (kept).
Step 2 — deploy
./scripts/deploy.sh
The script runs four stages and stops loudly on any failure:
fetch-sources.sh— clone/update both repos atuni-proddocker compose build— build backend and frontend imagesdocker compose up -d— start postgres → backend → frontend in dependency order with health gateshealthcheck.sh— wait until the backend actuator reportsUPand the frontend serves a page
First build takes several minutes (full Maven + pnpm builds); later runs reuse Docker layer caches.
Step 3 — verify
- Open
http://<host>:3000— the login page should render. curl http://<host>:8080/actuator/health→{"status":"UP", ...}.- Create an account, create a workspace, upload a small TXT file, annotate a token, export — the full round trip.
Releasing a new version
# in the app repo(s): merge/fast-forward uni-prod from main, push
# then on the host:
cd genesis-deploy
git pull            # pick up any pipeline/config changes
./scripts/deploy.sh # rebuilds only what changed
See Operations for logs, backups, and rollback.